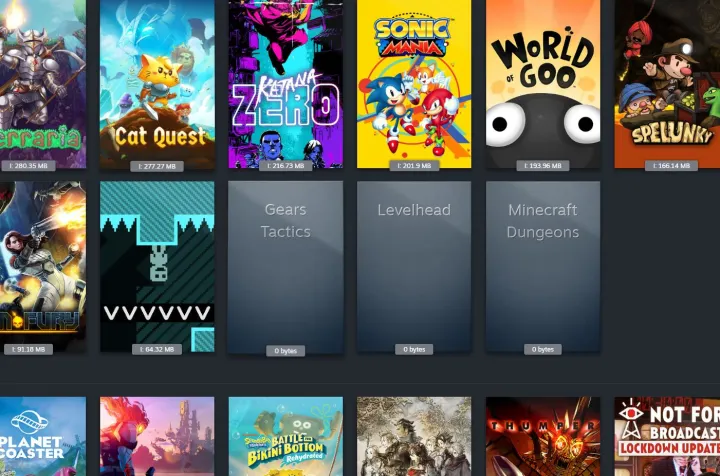
Steam is the place for PC games, but several games are only available on other storefronts. The Epic Games Store, Ubisoft Connect, Origin, and more have games that you can’t find on Steam. To clean up your desktop gaming experience and make the upcoming Steam Deck a little easier to use, we’re going to show you how to add external games to your Steam library.
CONTENTS
- How to add Steam codes to your Steam library
- How to add Epic games to your Steam library (as well as Ubisoft Connect, GOG, and Origin)
- How to add emulator games to your Steam library
- Add command line arguments
- How to add Windows games and apps to your Steam library
DIFFICULTY
Moderate
DURATION
20 minutes
WHAT YOU NEED
- PC
- External games
Although you can add almost any game to Steam, you won’t have access to social features or achievements. Instead, Steam allows you to connect apps so you can see and launch them from your library page — though it doesn’t go through the effort of fetching box art of anything of the sort.
How to add Steam codes to your Steam library
When you buy games from third-party stores and services, such as Amazon, those games are often actually Steam games, and you can redeem them through Steam using a code provided by the seller. Codes are 12 characters long, and they’re pretty easy to use.
Step 1: Fire up Steam and find the option to redeem a code.
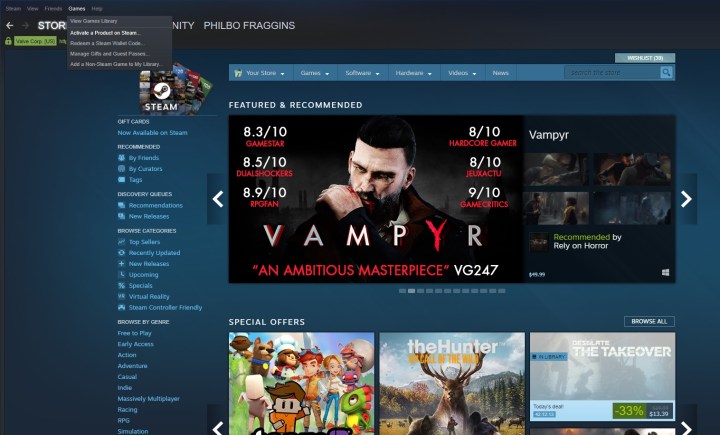
Step 2: Once you’re in Steam, head to the top of the client and look for the Games menu at the top. Click on Activate a product on Steam.
Step 3: That’ll open up a new window; click Next, then agree to the Steam subscriber agreement.
Step 4: After that, you’ll finally come to the window where you can input your Steam key. Hit Next again to confirm it.

Step 5: The next window will let you install the game on your computer immediately. You can also cancel at this step, which will add the game to your account but not immediately install it.
How to add Epic games to your Steam library (as well as Ubisoft Connect, GOG, and Origin)
Many games are exclusive to the Epic Games Store, but you can still add them to your Steam library. Although we’re talking about adding Epic games to your Steam library here, the same process works across all PC gaming platforms, including Ubisoft Connect, GOG, Origin, and more.
You can add non-Steam games to your Steam library, but you won’t have access to achievements, trading cards, or any of the social features normally attached to Steam games. It’s simply a way to launch games from the Steam interface.
Here’s how to add a non-Steam game to Steam:
Step 1: Find the game on your computer. Before you start the process, you’ll save yourself time by figuring out where you installed the game you’re looking for on your computer. You’ll need the file pathway so you can direct Steam to find the game’s files.
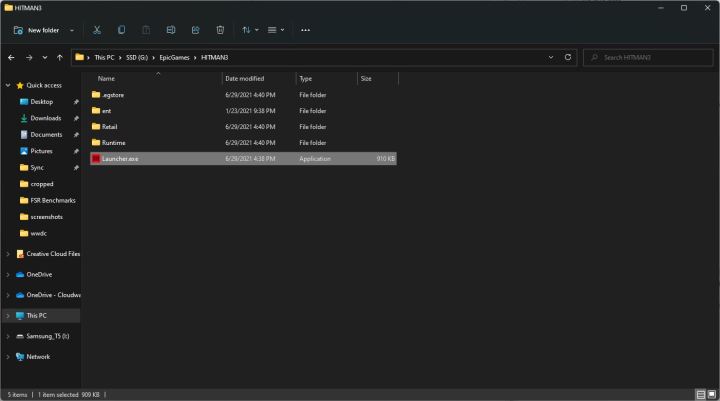
Step 2: For Epic Games, you will have a folder called EpicGames on the drive you chose for installation, which will hold the folders for all the games you have installed. If you didn’t choose a separate drive location, you can find your games installed in Epic’s default location — C:Program FilesEpic Games[Game Name].
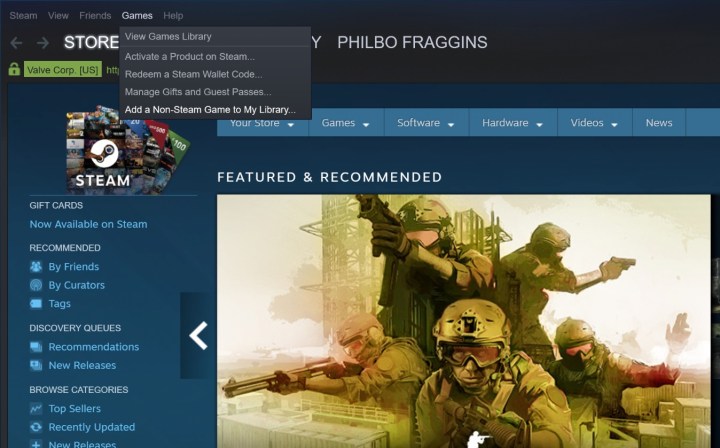
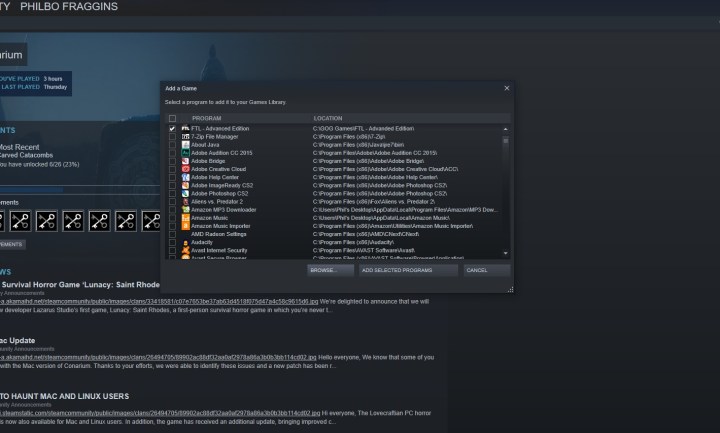
Step 3: Launch Steam and find the Games menu. At the top of the Steam interface, you’ll find a number of pull-down menus with a variety of options. You’re looking for the Games menu. Click it, then look for the bottom menu option, labeled Add a non-Steam game to my library. That’ll pull up a separate window that will allow you to find the program you’re looking to add.
Step 4: Select the program, or go hunt it down. Steam does a pretty good job of detecting installed programs on your system, so if you’ve installed the game already, there’s a strong chance it’ll be listed in the separate window.
Step 5: If it’s there, just click the box next to the game you want to add, then push the Add selected programs button.
Step 6: If the game isn’t listed, you’ll need the file path to the game, which you should have already if you tracked it down earlier. Hit the Browse button at the bottom of the window and navigate to the game’s location on your computer.
Step 7: Find the executable and select it. That should add the game to the original window, and you can now hit the Add selected programs button on your Steam window.
How to add emulator games to your Steam library
Digital Trends does not promote piracy, but that doesn’t stop many players out there on the internet from using software emulators and ROMs to play old games — and there’s a legal argument to be made for creating ROM copies of your own games or downloading ROM copies of games you’ve legally purchased that you don’t distribute to others. In any case, whether it’s legal or not, people play ROMs, and sometimes they want to add them to their Steam libraries.
There are actually quite a few ways to do that and even some tools to make the process easier. It’s tougher to add ROMs to Steam because, in addition to creating a shortcut to the ROM itself like you would with any other game, you also need to tell Steam to access the emulator necessary for playing it. You can speed up the process with tools such as Ice or Steam ROM Manager to add your ROMs to Steam.
You can also create your own shortcuts in Steam that will work with your ROMs, much in the same way you add non-Steam games to your Steam library.
Step 1: Create a shortcut to any .exe file. First, use the same steps above that you would to add a game to Steam, but choose any executable program file. All you’re doing here is making a shortcut you’ll edit later, so it doesn’t matter what program you use — you’ll be changing it.
Step 2: Find the folder where your emulator and ROMs are installed. Just as above, take a second and find the file path to the emulator and ROMs you’re looking to use. You’ll need them in a moment, and writing down or copying the file path ahead of time will save you a little time later.
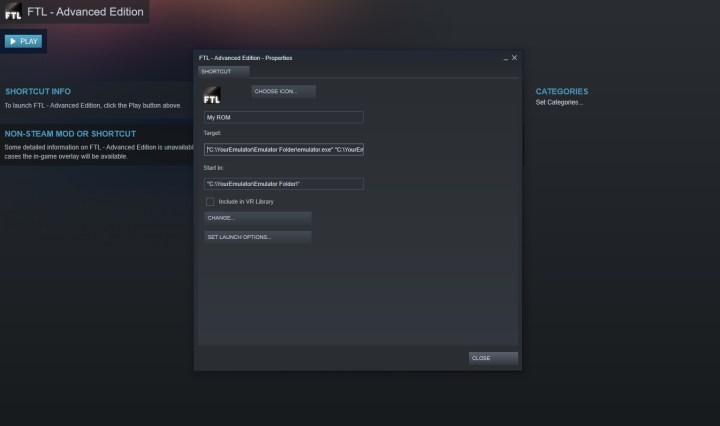
Step 3: Edit the shortcut. In Steam, find the program you just added from your library. Select or right-click the game and use the menu that pops up to navigate down to Properties.
Step 4: That’ll pull open a screen that lets you edit the shortcut you created, including changing the name and icon that goes with it and altering the file path for the shortcut. Here, you’ll just plug in the information for your emulator and ROM to add it to Steam.
Step 5: Change the name of the shortcut to whatever the title of your ROM is, then highlight the text in the Target field.
Step 6: Replace it with the file path to the emulator, making sure to keep quotation marks around it.
Step 7: Put a space after the end of the file path to the emulator, and then add the file path to the ROM you want to use — again putting quotation marks around it. Your finished field should look something like this: C:YourEmulatorEmulator Folderemulator.exe C:YourEmulatorEmulator FolderYour ROM game.n64.
Step 8: You’ll either want to delete the text in the Start in field or put the file path to your emulator folder in that field. In most cases, that should do it. The shortcut will now search for the emulator and run it and then the ROM and run that as well.
Add command line arguments
For some emulators, you’ll need additional commands in your Target field to tell the emulator what to do. There are a host of potential commands and they’re different for different emulators. You can find a big, useful list of command arguments at LaunchBox.com, and Steam user cunningmunki created a handy tutorial for adding ROMs to Steam that also lists a few of the most common emulators and their command arguments.
When you know what command arguments you need, you’ll generally add them to the Target field after the file paths for your emulator, but before the file path for your ROM.
How to add Windows games and apps to your Steam library
Windows is pretty open when it comes to third-party apps (after all, you can just chuck any ol’ .exe file into Steam and it’ll work). It’s not, however, open with its own apps. Windows apps don’t show up in the file explorer, so you can’t add them to Steam just by searching. Thankfully, there’s an open-source tool that will do the job for you, which is especially useful for adding games from Xbox Game Pass to Steam.
Step 1: To start, you need to download a tool known as UWPHook. Brian Lima, the developer, created it and there are many other projects yet to come from them, (including a nifty UI for playing itch.io games).

Step 2: You may get a SmartScreen notification when running the installer. We didn’t encounter anything malicious in the app (you can always use free antivirus software if you’re concerned).
Step 3: Export UWP apps to Steam. After downloading UWPHook, select it. Then tap on the Load installed UWP apps button. Keep in mind that this could take a bit of time for the software to thoroughly locate every Windows app on your device.
Step 4: After the list of applications is acquired, you can sort through them and highlight which ones you’d like to add to your Steam account.
Step 5: After selecting them, you can rename each app and export them. To fully export, you’ll need to tap on the Export selected apps to Steam option. After several seconds UWPHook will take over and copy them to your Steam Library.
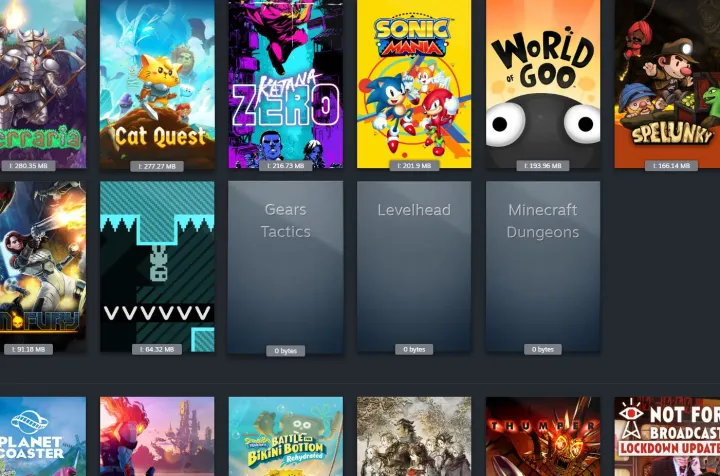
Step 6: To see your updated list of applications in Steam, you have to reboot the system. After shutting it down and restarting Steam, every new app should appear in the library.
Step 7: If for some reason, some of your exported applications aren’t there, you may need to log the AUMID for each missing app manually.
For a few tips, check out the UWPHook subreddit. This is a great way to check with other Reddit users to be sure your Steam is operating smoothly.
THANK YOU

